Do you know what’s more troubling than a dryer that refuses to turn on? A dryer that won’t turn off, which I’ve learned the hard way on a lazy Sunday morning.
If, like me, you’re guilty of tossing the laundry into the dryer and forgetting about it, it’s about time you stopped. When I finally walked over to grab my clothes, I was surprised to see that my dryer was still running and hot to the touch.
Panicked, I quickly pulled out the power cord and sat in silence, realizing what would’ve happened if I hadn’t checked on it sooner. Without a doubt, it was a fire hazard.
If you’ve found yourself in the exact situation, we’re here to walk you through the steps and show you how to get your dryer to finally stop running.
Why won’t my dryer turn off?
A dryer won’t turn off due to faulty moisture sensors and restricted airflow, which are easy issues that can be resolved by cleaning. If a defective dryer timer, door switch, or control board is causing the problem, a replacement is required.
Before looking into potential repairs, we’ll show you a few ways to troubleshoot your dryer and turn it off.
- Reset the dryer.
Unplug the power cord or turn off the circuit breaker. Sometimes, a hard reset is all it needs to clear out any glitches and bugs that might be causing the system to malfunction.
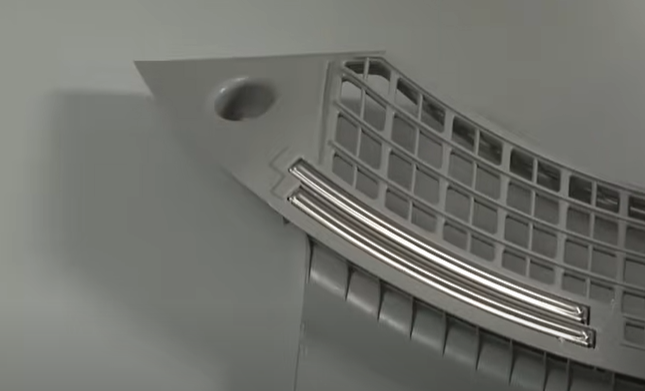
- Clean the moisture sensors.
If your unit has an AutoDry feature, check the moisture sensors. They automatically adjust the drying times and heat based on how damp your laundry is.
When the sensors are dirty, they may malfunction, causing the dryer to run indefinitely or turn off prematurely. Luckily, it’s an easy fix that only needs rubbing alcohol and a clean cloth.
Once your dryer restarts, check if you can power it off successfully. If it still won’t, just keep reading our guide to learn how to identify potential underlying issues and the best ways to fix them.
Causes and Solutions
Here’s an overview of the potential causes of a dryer that won’t turn off, along with step-by-step instructions for resolving them.
| Causes | Solutions |
| Faulty Moisture Sensors | Unplug the dryer or turn it off at the circuit breaker. Open the door and remove the lint filter. Unthread the screws on the filter housing. Lift the housing and unplug the wires from the moisture sensor bars. Use a small flathead screwdriver to remove the sensors. Get your new sensors and install them into the housing. Push them down until they snap into place. Reconnect the wires to the moisture sensors and mount the filter housing on the dryer. Then, reinstall the mounting screws and the lint filter. Close the door and restore power to the dryer. Run a test cycle to check if the dryer turns off automatically. |
| Restricted Airflow | Unplug the dryer or turn it off at the circuit breaker. Locate the lint screen and remove it. Check your user manual for reference, if needed. Roll the lint off the screen using your fingers. Wash both sides of the screen with water. Mix liquid detergent and hot water in a small container. Dip a nylon brush into the cleaning solution. Then, scrub both sides of the screen thoroughly. Next, wipe the lint screen dry using a clean towel. Get a long-handled wire vent brush. Slide it into the filter housing to get rid of dirt. If your vacuum has a flexible hose, use it to clean the inside of the housing. Then, vacuum the area around it to remove dirt buildup. Reinstall the lint screen and push it firmly into place. Use a clean towel to wipe the area around it. Reconnect your dryer to its power source. Once it restarts, check if you can turn it off. |
| Broken Door Switch | Unplug the dryer or turn it off at the circuit breaker. Pull out the lint screen. Unfasten the screws near the housing. Get a lanyard and tape one end to the top of the dryer. Press your knee against the dryer and grab the top panel on each side. Then, pull the panel forward to release it. Open the top panel. Hook the other end of the lanyard to keep the panel open. Unfasten the screws at the top of the door jamb. Locate the door switch. Use a flathead screwdriver to disconnect the wire plug. Connect the new door switch. Insert it into the cutout. Reinstall the screws at the top of the door jamb. Then, close the door. Unhook the lanyard from the dryer. Carefully lower the top panel and close it shut. Push the panel down until it locks into place. Remove the lanyard that’s taped to the top panel. Reinstall the screws near the lint screen housing. Slide the lint screen back into place. Restore power to your dryer. |
| Defective Dryness Control Board | Unplug the dryer or turn it off at the circuit breaker. Move the dryer away from the wall. Unthread the rear screws mounting the control panel. Slide a putty knife under each corner of the control panel to release the spring clips. Then, open the control panel. Locate the dryness control board. Press the mounting brackets and pull to remove the board from the dryer. Install the new board and press it down to lock it in place. Connect the wires from the old board to the replacement. Reinstall the control panel and the mounting screws. Then, restore power to the dryer. |
| Malfunctioning Dryer Timer | Unplug the dryer or turn it off at the circuit breaker. Pull the dryer from the wall to access the rear panel. Unthread the control panel’s rear screws. Slide a putty knife under the right corner of the control panel to release the spring clip. Repeat this step on the left corner. Pull the control panel forward to detach it from the dryer. Take a photo of the wire connectors on the timer. Refer to this during reassembly. Unplug the wire connectors. Then, unthread the screws mounting the timer to the control panel. Get your new timer and mount it on the control panel. Rethread the left mounting screw. Realign the buzzer and secure it under the right screw. Plug the wire connectors to the correct terminals on the new timer. Use your photo for reference. Mount the timer knob. Reinstall the rear panel, then push it down to lock it in place. Rethread the control panel’s mounting screws. Restore power to the dryer. Then, run a test cycle to confirm that the problem is fixed. |
| Faulty Control Board | Unplug the dryer or turn it off at the circuit breaker. Pull the dryer away from the wall to access the rear panel. Unfasten the screws mounting the top panel and bracket to the rear panel. Slide the top panel back and lift to detach it. Take a photo of the orientation of the wires on the control board. Use it for reference during reassembly. Disconnect all the wires on the control board. Unfasten the screws securing the control board mounting bracket to the frame. Remove the screws securing the control board to the bracket. Rotate the board, and press the retaining tab to detach the board. Get the new control board. Align it on the mounting bracket and slide it back to secure it. Reinstall the screws to mount the control board. Then, fasten the screws securing the bracket to the frame. Plug the wire connectors to the correct terminals on the new control board. Use your photo for reference. Realign the top panel and bracket. Slide it into place and reinstall the rear screws. Restore power to the dryer. Check if it functions and turns off properly. |
Faulty Moisture Sensors
Moisture sensors detect how damp your load is. Then, they automatically adjust the settings to promote better drying efficiency and prevent overheating.
Aside from dirt build-up, mechanical or electronic issues may cause them to malfunction. Either way, you must replace the faulty sensors to fix the dryer.

What you’ll need:
- Multiscrewdriver
- Phillips head bit
- Multimeter
- New moisture sensors
Solution: Use a multimeter to check the moisture sensors for continuity and determine if a replacement is needed.
- Step 1: Open the dryer door.
- Step 2: Locate the moisture sensors. Refer to your user manual if necessary.
- Step 3: Get a multimeter and turn the dial to the highest setting for ohms of resistance.
- Step 4: Touch each probe to a sensor bar.
If the display shows ohms of resistance, the sensor bar has shorted and requires replacement.
To replace a faulty moisture sensor, follow these steps:
- Step 1: Disconnect your dryer from its power source.
- Step 2: Open the dryer door and remove the lint filter.
- Step 3: Unthread the screws on the filter housing.
- Step 4: Lift the housing and unplug the wires from the moisture sensor bars.
- Step 5: Use a small flathead screwdriver to remove the sensors.
- Step 6: Get your new sensor bar and install it in the housing. Push it down until it snaps into place.
- Step 7: Reconnect the wires to the moisture sensor bars and mount the filter housing on the dryer.
- Step 8: Reinstall all the mounting screws and the lint filter.
- Step 9: Close the door and restore power to the dryer.
- Step 10: Run a test cycle to check if the dryer is functioning properly.
Restricted Airflow
Dirt buildup in your dryer and your vent system prevents moist air from being expelled. It causes overheating, which triggers safety mechanisms and prevents the machine from turning off.
One of the tell-tale signs of restricted airflow is long drying times. Once you notice changes in your dryer’s efficiency, you should check for obstructions, especially on the lint screen.
This small mesh filter traps lint and other debris from the drying process, preventing them from entering the vent system. You must clean it after each load so your dryer doesn’t overheat.
What you’ll need:
- Nylon brush (or old toothbrush)
- Long-handled wire vent brush
- Liquid detergent
- Hot water
- Clean towel
- Vacuum
Solution: To clean a dryer’s lint screen, follow these steps:
- Step 1: Disconnect your dryer from its power source.
- Step 2: Locate the lint screen. Refer to your user manual if needed.
- Step 3: Pull the lint screen out of your dryer.
- Step 4: Use your fingers to roll the lint off the screen.
- Step 5: Mix liquid detergent and hot water in a small container. Then, dip a nylon brush into the cleaning solution.
- Step 6: Gently yet thoroughly scrub each side of the lint screen with the brush.
- Step 7: Rinse the lint screen in hot water. Carefully inspect it for detergent residue and dirt, and if needed, rinse it again.
- Step 8: Wipe the lint screen dry with a clean towel.
- Step 9: Slip a long-handled wire brush into the filter housing to pull out dirt buildup. Repeat this step until the brush comes out clean.
- Step 10: Use a vacuum to reach inside again and remove remaining dirt.
- Step 11: Wipe the area around the filter housing using a dry, clean towel.
- Step 12: Reconnect your dryer to power. Once it restarts, press the power button to confirm that it turns off.
Quick Note:
Aside from an obstructed lint screen, there are other possible causes of poor airflow in a dryer. A kinked or crushed vent hose, a clogged dryer vent, and a blocked outdoor exhaust are also common causes of this problem.
Check out our Check Vent error guide to learn how to restore good airflow in your dryer and vent system.
Broken Door Switch
Does your dryer keep on running even when its door is open? If this is the case, you’re most likely dealing with a broken door switch, a safety feature that signals the control board when to run a cycle.
When you open the door, the switch cuts power to the motor, preventing your dryer from running a cycle. If the switch is faulty, it can’t properly detect whether the door is open or closed.
As a result, your dryer might not turn off even when you open the door. To fix this problem, you must remove and replace the broken switch.
What you’ll need:
- Tape
- Lanyard
- Phillips screwdriver
- Flathead screwdriver
- New dryer door switch
Solution: To replace the door switch of a top-load dryer, follow these steps:
- Step 1: Disconnect your dryer from its power source.
- Step 2: Remove the lint screen from your dryer.
- Step 3: Use a Phillips screwdriver to unfasten the screws near the lint screen housing.
- Step 4: Get your lanyard and tape one end to the top of the dryer.
- Step 5: Press your knee against the dryer and grab the top panel on each side. Then, pull the panel forward to release it.
- Step 6: Hook the other end of the lanyard to keep the top panel open.
- Step 7: Open the dryer door.
- Step 8: Unfasten the screws at the top of the door jamb.
- Step 9: Locate the door switch. Use a flathead screwdriver to disconnect the wire plug.
- Step 10: Connect your new door switch. Insert it into the cutout by the door.
- Step 11: Reinstall the screws at the top of the door jamb.
- Step 12: Close the door.
- Step 13: Unhook the lanyard from the dryer.
- Step 14: Carefully lower the top panel and close it shut.
- Step 15: Push the panel down until it locks into place.
- Step 16: Remove the lanyard that’s taped to the top panel.
- Step 17: Reinstall the screws near the lint screen housing.
- Step 18: Slide the lint screen back into place.
- Step 19: Restore power to your dryer.
Defective Dryness Control Board
If the dryer won’t turn off when you use AutoDry, but the timer is functioning well, you might be dealing with a defective dryness control board.
When this happens, the component can’t send power to the timer, preventing it from advancing and turning off the dryer. Replacing the defective component is easy and should fix your problem in no time.
What you’ll need:
- Putty knife
- ¼” socket or nut driver
- New dryness control board
Solution: To replace a dryness control board, follow these steps:
- Step 1: Disconnect your dryer from its power source.
- Step 2: Move the dryer from the wall to access the back panel.
- Step 3: Use a ¼” socket or nut driver to unthread the rear screws securing the control panel.
- Step 4: Insert a putty knife under the right corner of the control panel to release the spring clips. Repeat this step for the left corner.
- Step 5: Squeeze the mounting brackets on the dryness control board and pull to remove.
- Step 6: Insert the new board into the control panel. Gently press it down to lock it in place.
- Step 7: Transfer the wire connectors on the old board to the new one.
- Step 8: Reinstall the control panel and the mounting screws.
- Step 9: Restore power to the dryer and check if the fix worked.
Malfunctioning Dryer Timer
Another likely culprit behind a dryer that won’t turn off is a broken timer, which controls the progression of the cycles. It determines when the heater turns on and off during the cycles, and when the dryer turns off.
If parts are broken or the motor fails, the timer becomes defective. You might be able to run a cycle, but it won’t reach the off position.
By performing a continuity test, you can determine if the timer is malfunctioning. A replacement will be necessary if the component is defective.
What you’ll need:
- 1/4” socket or nut driver
- Putty knife
- Get a multimeter
- Wiring diagram
- New dryer timer
Solution: Disassemble the dryer to access the timer. Perform a continuity test to confirm if a replacement is necessary.
- Step 1: Disconnect your dryer from its power source.
- Step 2: Move the dryer away from the wall to access the back panel.
- Step 3: Use a ¼” socket or nut driver to unthread the rear screws securing the control panel.
- Step 4: Insert a putty knife under the right corner of the control panel to release the spring clips. Repeat this step for the left corner.
- Step 5: Pull the control panel forward to detach it from the dryer.
- Step 6: Locate the timer, but leave it connected to the control panel.
- Step 7: Get a multimeter and set the dial to the continuity setting.
- Step 8: Press the probes together. If the display shows zero resistance, your multimeter is functioning properly.
- Step 9: Turn the dryer’s knob to the OFF position.
- Step 10: Place each probe on a terminal indicated in your dryer’s wiring diagram for the End of Cycle. Check for continuity.
- Step 11: If your test doesn’t match the results indicated on the wiring diagram, your timer is faulty and requires replacement.
Unfortunately, there is no fix for a defective timer. You must remove and replace it with a new one to get your dryer back up and running.
To replace a malfunctioning dryer timer, follow these steps:
- Step 1: Disconnect your dryer from its power source.
- Step 2: Pull the dryer away from the wall to access the back panel.
- Step 3: Unthread the rear screws of the control panel using a ¼” socket or a nut driver.
- Step 4: Slide a putty knife under the right corner of the control panel to release the spring clips. Repeat the step on the left corner.
- Step 5: Pull the control panel forward to detach it from the dryer.
- Step 6: Take a photo of the wire connectors on the timer. Refer to this during reassembly.
- Step 7: Unplug the timer’s wire connectors.
- Step 8: Unthread the screws mounting the timer to the control panel.
- Step 9: Remove the timer knob. Then, detach the timer from the control panel.
- Step 10: Get your new timer and mount it on the control panel.
- Step 11: Rethread the left mounting screw. Realign the buzzer and secure it under the right screw.
- Step 12: Plug the wire connectors to the correct terminals on the new timer. Use your photo for reference.
- Step 13: Mount the timer knob. Realign the control panel on the rear panel, then push it down to lock the spring clips into place.
- Step 14: Rethread the control panel’s mounting screws.
- Step 15: Restore power to your dryer.
- Step 16: Run a test cycle to confirm that the problem is fixed.
Faulty Control Board
Once you’ve ruled out everything else, you should look at the control board, which is the component that controls the dryer’s functions. That includes monitoring and managing the cycles.
If the control board is defective, it might not be able to detect the end of the cycle, causing the dryer to run indefinitely.
Unfortunately, a defective control board can’t be fixed. You must replace the faulty component to get your dryer to function properly.
What you’ll need:
- T-25 Torx bit
- Phillips screwdriver
- ¼” socket
- New control board
Solution: To replace a faulty control board, follow these steps:
- Step 1: Disconnect your dryer from its power source.
- Step 2: Pull the dryer away from the wall to access the rear panel.
- Step 3: Use a ¼” socket to unthread the screws mounting the top panel and bracket to the rear panel.
- Step 4: Slide the top panel back and lift to detach. Then, set it aside.
- Step 5: Take a photo of the wires connected to the control board. Use it for reference during reassembly.
- Step 6: Disconnect all the wires connected to the control board.
- Step 7: Unfasten the screws securing the control board mounting bracket to the frame.
- Step 8: Remove the screws securing the control board to the bracket.
- Step 9: Rotate the bracket. Use a screwdriver to press the retaining tab and detach the control board.
- Step 10: Get the new control board. Align it on the mounting bracket and slide it back to secure it.
- Step 11: Reinstall the screws to mount the control board.
- Step 12: Thread the screws securing the bracket to the frame.
- Step 13: Plug the wire connectors to the correct terminals on the new control board. Use your photo for reference.
- Step 14: Realign the top panel and bracket. Slide it into place and reinstall the rear screws.
- Step 15: Restore power to the dryer.
- Step 16: Run a test cycle to check if the dryer functions properly.
FAQs
Is a dryer control board worth replacing?
A control board can be an expensive part to replace, depending on the make and model of your unit. However, it might be a cost-effective fix for your problem, especially if your dryer is new and if other components are still functioning properly.
If the cost of the replacement, or any repair for that matter, exceeds 50% of a new dryer’s price, it’s not worth the fix. You might as well invest in a new unit.
How do I reset a dryer?
Most dryers don’t have a reset button. If your dryer isn’t turning off or functioning properly, you can reset it by unplugging the power cord or turning off the circuit breaker.
After a few minutes, restore power to the dryer to clear glitches and bugs in the system that could be causing it to malfunction.


