No one wants to find freshly laundered clothing sitting in water, especially when it looks dirty or sudsy. In most cases, you’ll find an E1 F9 error on your Maytag washer that you must resolve before running a new cycle to clean the clothes properly.
Depending on the underlying cause, the fix can either be very easy or tedious. Before picking up the phone and dialing repair services, read our guide below to find out what you can do to troubleshoot an E1 F9 error code.
What is an E1 F9 error code on a Maytag washer?
Here are a few ways to troubleshoot a Maytag washer that won’t drain.
- Inspect the drain hose for any kinks. Straighten out any kinks and bent areas that may be restricting the flow of water out of the washer.
- Reset the washer. Cancel the cycle and reset the washer by disconnecting it from power for at least a minute.
If these quick fixes don’t solve your problem, keep reading our guide below as we delve into other common causes of an E1 F9 error on a Maytag washer.
Causes and Solutions
To fix an E1 F9 error code on a Maytag washer, you might only have to straighten out any kinks or remove instructions in the drain hose. If the error is caused by a clog, a deep cleanse should solve your problem.
However, if a faulty component is the root cause of the error, a replacement is needed.
Here’s an overview of the possible causes of an E1 F9 error code on a Maytag washer.
| Causes | Solution |
| Too Much Detergent | • Stop the cycle and empty the drum. Transfer your laundry to a separate container while you clean the washer. • Add an affresh washer cleaner or a regular liquid bleach product, then run a cleaning cycle. • For top-load models, run a rinse and spin cycle after the cleaning cycle. • Then, remove and wash the agitator to remove any excess cleaner. • Skip to the next step if you have a front-load washer. • Open the washer door to let the drum dry thoroughly. • Clear away any excess detergent around the dispenser area using a damp cloth. Wipe the area dry. • Clean in and around the washer door. Wipe the exterior of the unit using a clean, damp cloth. |
| Dirty Drain Pump Filter | • Unplug the power cord or turn off the power at the circuit breaker. • Open the dispenser drawer to access the drain pump filter. • Depress the tab on the right side of the drawer and pull the tab on the left. Then, remove the drawer. • Set a small flat container underneath the drain pump filter to collect the water. • Release the drain hose from the hose clip and remove the plug to start draining the water into the container. • Empty the container and repeat the process until there’s no more water left to drain. • Replace the plug and secure the hose into the clip. • Place a towel underneath the drain pump filter to absorb any excess water. • Rotate the filter in a counterclockwise direction and pull it out for cleaning. • Remove any large clumps by hand. Rinse the filter under running water to get rid of smaller debris. • Insert the drain pump filter into the housing. Rotate it clockwise to secure it. • Insert the dispenser drawer until it snaps into place. |
| Obstructed Drain Hose | • Unplug the washer or turn off power at the circuit breaker. Disconnect the drain hose from its port. • Connect the end of the drain hose to a wet or dry vacuum. Then, use tape to seal the ends together. • Turn on the vacuum and keep it running for 5 minutes. • Clean the drain hose using a homemade solution of 1:1 warm water and distilled white vinegar. • Pour the solution down the hose and let it sit. After 15 minutes, pour hot water down the hose to clear the solution. • Wipe the drain port on the washer before reattaching the hose. • Restore power to the washer and turn it on. Run a quick cycle to confirm that the washer drains. |
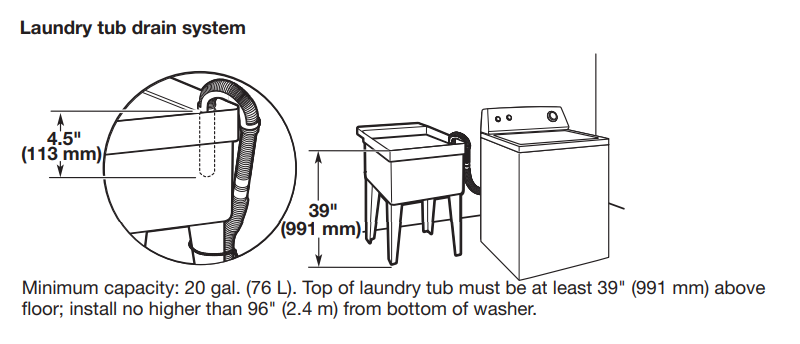
| Incorrect Drain Hose Installation (Standpipe) | • Use the measuring tape to confirm that the top of the standpipe is at least 39” from the floor and no more than 96” high. • Make the necessary adjustments to meet this requirement. • Insert the drain hose 4.5” into the standpipe. Don’t insert the hose too far down the pipe as it will cause siphoning. • Secure the drain hose to the standpipe using the supplied tie. |
| Incorrect Drain Hose Installation (Laundry Tub) | • Check that the top of the laundry tub measures at least 39” from the floor and no more than 96” high. • Hook the drain hose onto the laundry tub. Make sure to insert 4.5” of the hose into the tub to prevent siphoning. • Secure the drain hose to the leg of the laundry tub. |
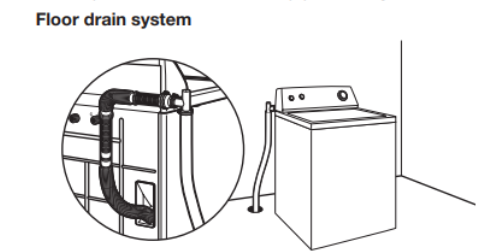
| Incorrect Drain Hose Installation (Floor Drain) | • Remove the pre-installed drain clamp on the hose. • Elevate the siphon break at least 28” from the floor. • Insert the hose about 4.5” into the drain pipe. Refrain from inserting the excess hose too far down the pipe as it will cause siphoning. |
| Faulty Lid Switch | • Unplug the washer or turn off the power at the circuit breaker. Shut off the water supply to the washer. • Disconnect the drain and water supply hoses. Tape the door shut. • Move the washer away from the wall to access the back panel. • Use the ¼” nut driver to unfasten the screws on the small cover and the rear access panel. Set the cover and panel aside. • Unplug the lid switch’s wire connector. Refer to your user manual, if necessary. • Remove the plastic retainer clip. Then, squeeze the two prongs on the wire harness retainer and push it down to release it. • Remove the two screws securing the top panel. • Pull the top forward and lift it up until the tabs on the rear panel fit into the slots on the top. • Get the holding strap and attach the hooks to the washer’s top and main body. • Use the flathead screwdriver to pry the lid switch out. • Remove the wire harnesses from the retaining clips. Then, pull the harness out and set it aside. • Get the new lid lock assembly and slide it into position. • Insert the wire harness into the opening on the washer’s top. Then, slip the wire under the retaining clips to keep it secure. • Push the wire harness retainers into the slot on the washer’s top until it snaps into place. • Unhook the holding straps. Close the washer’s top by simply pressing it down until it is secure. • Attach the retaining clip of the lid switch’s wire harness. Then, reconnect the wire to the control board. • Reinstall the two screws that secure the top panel. Then, mount the rear access panel and the small cover. • Reconnect the hoses and turn on the water supply. • Restore power to the washer. Run a test cycle to confirm that the door latches and the unit drains properly. |
| Faulty Drain Pump | • Unplug the washer and turn off the power at the circuit breaker. • Turn off the water supply. Then, disconnect the drain and inlet hoses from the washer. • Move the washer away from the wall and tilt it forward to access the drain pump at the bottom of the unit. • Carefully remove the insulation underneath the washer and set it aside. • Then, lay a towel or a rag in case of accidental spills. • Locate the drain pump assembly. Check the user manual for reference, if needed. • Unplug the wires connected to the drain pump. Use a flathead screwdriver if the wires are hard to pull out. • Loosen the clamps securing the hoses, then disconnect the hoses from the pump. • Use a 5/16” nut driver to remove the screws mounting the pump to the washer. • Disconnect the faulty drain pump from the washer. Get your replacement and attach it to the hoses. • Use the 5/16” nut driver to reinstall the screws and secure the pump to the washer. • Tighten the clamps on the hoses to secure the connections. After, plug in the wires to the terminals on the pump. • Reinstall the insulation and keep your washer upright. Then, reconnect the drain and inlet hoses to the unit. • Turn on the water supply and reconnect the washer to power. Run a test cycle to confirm that the unit can drain properly. |
| Defective Main Control Board | • Unplug the washer or turn off the power at the circuit breaker. • Turn off the water supply, then disconnect both inlet hoses. • Move the washer away from the wall and turn it around to access the back panel. • Remove the bolts mounting the panel. Insert a flathead screwdriver under the front control panel housing, then pry it open. • Disconnect the wire harness and set the control panel aside. • Take a photo of the wires connected to the main control board. Use it as a reference for the reassembly process. • Unplug the switch wire connectors on the control board. Use a flathead screwdriver to release the bracket and retainer. • Detach the air pressure tube.Use a ¼” nut driver to unfasten the screws securing the control board. • Remove the center knob, then lift the faulty control board to remove it from the panel. • Prep your new control board by transferring the wire retaining bracket from the old assembly to the new one. • Align the control board with the slots on the panel. • Reinstall the screws to secure the board. Then, return the center control knob. • Plug in all the wire connectors to the correct terminals on the new control board. Use your photo for reference. • Secure the wires on the bracket and retainer. Reattach the air pressure tube. • Align the control panel with the rear panel, then push down until it snaps into place. • Reinstall the screws on the rear panel and reconnect all the hoses. • Turn on the water supply and restore power to the washer. Run a test cycle to confirm that the washer drains properly. |
Too Much Detergent
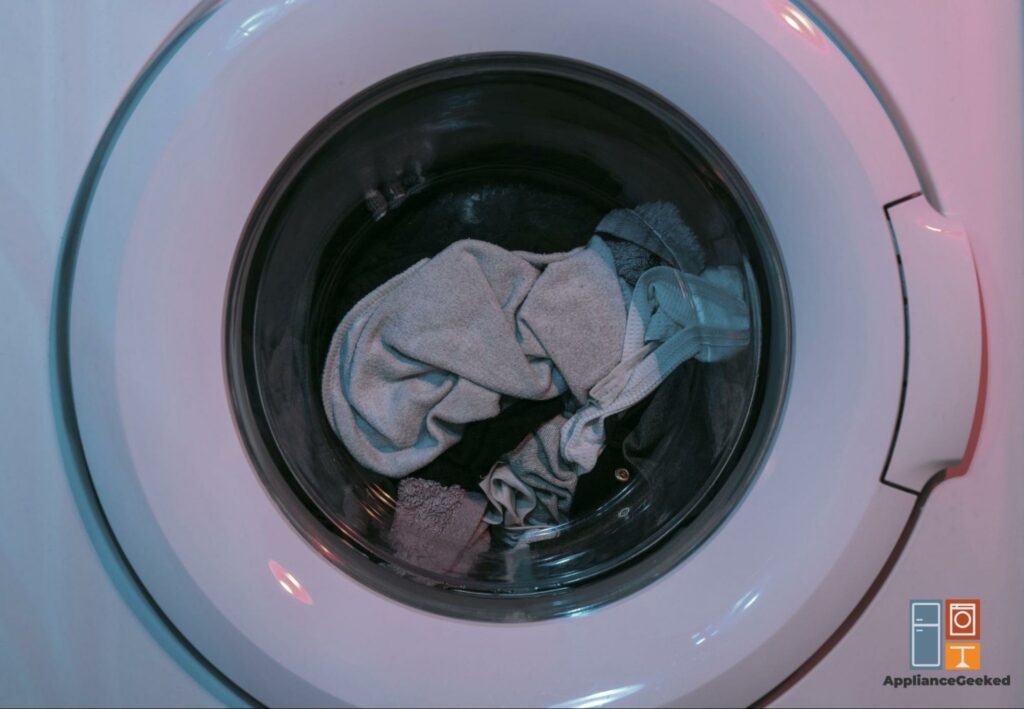
Do you see a lot of suds in the drum? If you have an excessive amount of foam in your washer, you most likely added too much detergent or the wrong kind.
High-efficiency washers can only use high-efficiency detergent, which have low-sudsing and quick-dispensing formulas. Using regular detergent in an HE washer will lead to a sud error and often a drain error.
When there are too many suds, your detergent won’t dissolve properly, causing it to build up and obstruct the drain hose.
What you’ll need:
- Affresh cleaner
- Towels
Solution: Run a cleaning cycle to get rid of the excess foam and detergent residue in your Maytag washer. Follow these steps to resolve your problem.
- Step 1: Stop the cycle and empty the drum. Transfer your laundry to a separate container while you clean the washer.
- Step 2: Add an affresh washer cleaner or a regular liquid bleach product, then run a cleaning cycle.
- Step 3: If you have a top-load washer, run a rinse and spin cycle after the cleaning cycle. You can also remove and wash the agitator to remove any excess cleaner.
Skip to the next step if you have a front-load washer.
- Step 4: Leave the door open to let the drum dry.
- Step 5: Clear away any excess detergent around the dispenser area using a damp cloth. Wipe the area dry.
- Step 6: Clean in and around the washer door.
- Step 7: Wipe the exterior of the unit using a clean, damp cloth.
After cleaning your washer, you can run a new cycle without detergent to clean the load that might still have suds and detergent residue.
We recommend following the detergent manufacturer’s instructions when determining how much detergent to use. Never go over the max line in the dispenser and wipe any accidental spills around the dispenser drawer.

| Type of Detergent | HE Washers |
| Pod | 1 per cycle |
| Liquid | 2 tablespoons |
| Powder | 2 tablespoons |
Run hot or warm water settings for cleaning purposes. Detergent dissolves easily in hot or warm water, which can help reduce the build-up of residue in your tub.
Dirty Drain Pump Filter
Front-load washers have a filter that protects the drain pump from dirt and debris. Since its main function is to catch gunk, you have to clean it regularly to prevent a total obstruction, which can cause a drain error.
If you have a top-load model, you can skip this step and look for other likely causes of your drainage problem.

What you’ll need:
- Towels
- Small container
Solution: To clean a drain pump filter on a front-load Maytag washer, follow these steps:
- Step 1: Unplug the power cord of the washer.
- Step 2: Open the dispenser drawer to access the drain pump filter. To release the drawer, push down the tab on the right side of the drawer, then pull up the tab on the left side.
- Step 3: Set a small flat container underneath the drain pump filter to collect the water.
- Step 4: Release the drain hose from the hose clip and remove the plug to start draining the water into the container. Empty the container and repeat the process until there’s no more water left to drain.
- Step 5: Once done, replace the plug and secure the hose into the clip.
- Step 6: Place a towel underneath the drain pump filter to absorb any excess water.
- Step 7: Turn the knob on the filter in a counterclockwise direction and pull to remove the filter.
- Step 8: Remove any large clumps by hand. Rinse the filter under running water to get rid of smaller debris.
- Step 9: Insert the drain pump filter into the housing. Rotate it clockwise to secure it.
- Step 10: Insert both rails of the dispenser drawer simultaneously and push it in until it snaps into place. To check if it is secure, pull out the drawer all the way and check if the rails are locked in place.
Obstructed Drain Hose
Aside from the drain pump filter, the drain hose is a common location for a clog.
Sometimes, lint, hair, and other gunk from your clothes can accumulate on the hose and restrict the flow of water. Not to worry, all you have to do is remove that obstruction to enable your washer to drain properly.

What you’ll need:
- Vacuum cleaner
- Warm water
- Distilled white vinegar
- Small bowl
- Towel
- Tape
Solution: To unclog a drain hose, follow these steps:
- Step 1: Unplug the washer or turn off power at the circuit breaker.
- Step 2: Disconnect the drain hose from its port.
- Step 3: Connect the end of the drain hose to a wet or dry vacuum. Then, use tape to seal the ends together.
- Step 4: Turn on the vacuum and keep it running for 5 minutes.
- Step 5: Clean the drain hose using a homemade solution of 1:1 warm water and distilled white vinegar. Just pour the solution down the hose and let it sit for several minutes.
- Step 6: After 15 minutes, pour hot water down the hose to clear the solution.
- Step 7: Wipe the drain port on the washer before reattaching the hose.
- Step 8: Restore power to the washer and turn it on.
- Step 9: Run a quick cycle to confirm that the washer drains.
Incorrect Drain Hose Installation (Standpipe)
During the wash cycles, your washer pumps water out of the basket through the drain hose and onto the drain pipes. Whether you prefer to drain through a standpipe, floor, drain, or laundry tub, you must install the hose correctly to ensure proper drainage.
If the hose isn’t installed properly, your washer can’t pump the water out of the drum during cycles. On top of that, dirty water might re-enter the drum and soil all your clothes.
What you’ll need:
- Measuring tape
- Cable tie
Solution: To promote better drainage with a standpipe drain system, follow these steps:
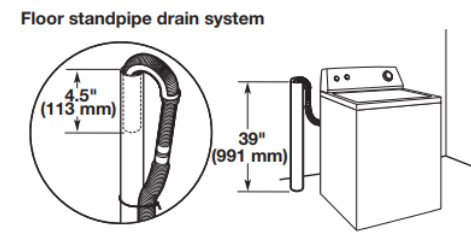
- Step 1: Use the measuring tape to confirm that the top of the standpipe is at least 39” from the floor and no more than 96” high. Make the necessary adjustments to meet this requirement.
- Step 2: Insert the drain hose 4.5” into the standpipe. Don’t insert the hose too far down the pipe as it will create a siphon effect, causing your washer to drain and fill at the same time.
- Step 3: Secure the drain hose to the standpipe using the supplied tie.
Quick Note:
Never seal the connection of the drain hose to the standpipe as this may cause siphoning, which makes your washer fill and drain at the same time.
Incorrect Drain Hose Installation (Laundry Tub)
Aside from a standpipe, you can drain the water out of your washer by connecting it to a laundry tub or utility sink. Just like a standpipe, your tub must measure at least 39” to 96” inches for proper drainage.
You need at least a 20-gallon laundry tub with a carry-away capacity of 72 gallons per minute.
What you’ll need:
- Measuring tape
- Cable tie
Solution: To install a drain hose on a laundry tub, follow these steps:
- Step 1: Check that the top of the laundry tub measures at least 39” from the floor and no more than 96” high.
- Step 2: Hook the drain hose onto the laundry tub. Make sure to insert 4.5” of the hose into the tub to prevent siphoning.
- Step 3: Secure the drain hose to the leg of the laundry tub.
Incorrect Drain Hose Installation (Floor Drain)
If you’re connecting the drain hose to a floor drain, you need a siphon break kit, which you can purchase separately. You need this to prevent dirty water from re-entering the drum during cycles.
What you’ll need:
- Siphon break kit
Solution: To set up a floor drain system for your Maytag washer, follow these steps:
- Step 1: Remove the pre-installed drain clamp on the hose.
- Step 2: Elevate the siphon break at least 28” from the floor.
- Step 3: Insert the hose about 4.5” into the drain pipe.
Faulty Lid Switch
On some washing machine models, the door has to latch properly before operations can start. This is a safety feature that protects the users from potential injury.
Clothes can snag on the door area, preventing the lid switch from latching. In such cases, all you have to do is remove the item that got caught in the door.
However, if nothing is obstructing the door from closing properly, you can inspect the door lock switch for potential damages. Over time, the locking mechanism will get worn out.
By then, your door will no longer latch, which can prevent your washer from starting, as well as draining. The only solution is to replace the lid switch.

What you’ll need:
- ¼” nut driver
- Holding strap
- Tape
- Flathead screwdriver
- New lid switch
Solution: Test the lid switch for continuity to confirm that it is defective and needs replacement. Follow these steps:
- Step 1: Unplug the washer or turn off the power at the circuit breaker.
- Step 2: Shut off the water supply to the washer.
- Step 3: Disconnect the drain and water supply hoses. Tape the door shut.
- Step 4: Move the washer away from the wall to access the back panel.
- Step 5: Use the ¼” nut driver to unfasten the screws on the small cover and the rear access panel. Set the cover and panel aside.
- Step 6: Unplug the lid switch’s wire connector. Refer to your user manual, if necessary.
- Step 7: Remove the plastic retainer clip. Then, squeeze the two prongs on the wire harness retainer and push it down to release it.
- Step 8: Use the ¼” nut driver to remove the two screws securing the top panel.
- Step 9: Pull the washer’s top forward and lift it up until the tabs on the rear panel fit into the slots on the top.
- Step 10: Get the holding strap and attach the hooks to the washer’s top and main body.
- Step 11: Use the flathead screwdriver to pry the lid switch out.
- Step 12: Remove the wire harnesses from the retaining clips. Then, pull the harness out and set it aside.
- Step 13: Rotate the dial on the multimeter to the lowest ohms of resistance.
- Step 14: Touch each of the probes to the switch’s power input terminals. Then, actuate the switch.
The multimeter will show close to 0 ohms of resistance if the switch has continuity. However, if the multimeter shows little to no change when you actuate the switch, it means that the component is defective and requires a replacement.
To replace your top-load Maytag washer’s faulty lid switch, follow these steps:
- Step 1: Unplug the washer or turn off the power at the circuit breaker.
- Step 2: Shut off the water supply to the washer.
- Step 3: Disconnect the drain and water supply hoses. Tape the door shut.
- Step 4: Move the washer away from the wall to access the back panel.
- Step 5: Use the ¼” nut driver to unfasten the screws on the small cover and the rear access panel. Set the cover and panel aside.
- Step 6: Unplug the lid switch’s wire connector. Refer to your user manual, if necessary.
- Step 7: Remove the plastic retainer clip. Then, squeeze the two prongs on the wire harness retainer and push it down to release it.
- Step 8: Use the ¼” nut driver to remove the two screws securing the top panel.
- Step 9: Pull the washer’s top forward and lift it up until the tabs on the rear panel fit into the slots on the top.
- Step 10: Get the holding strap and attach the hooks to the washer’s main top and body.
- Step 11: Use the flathead screwdriver to pry the lid switch out.
- Step 12: Remove the wire harnesses from the retaining clips. Then, pull the harness out and set it aside.
- Step 13: Get the new lid lock assembly and slide it into position until it is seated properly.
- Step 14: Insert the wire harness into the opening on the main top. Then, slip the wire under the retaining clips to keep it secure.
- Step 15: Push the wire harness retainer into the slot on the washer’s top until it snaps into place.
- Step 16: Unhook the holding straps. Close the washer’s top by simply pressing it down until it is secure.
- Step 17: Attach the retaining clip of the lid switch’s wire harness. Then, reconnect the wire to the control board.
- Step 18: Use the ¼” nut driver to reinstall the two screws that secure the top panel.
- Step 19: Reinstall the rear access panel and its screws. After, mount the small cover.
- Step 20: Reconnect the hoses and turn on the water supply.
- Step 21: Restore power to the washer. Run a test cycle to confirm that the door latches and the unit drains properly.
Faulty Drain Pump
After thoroughly checking the hoses for possible obstructions and cleaning the filters, you can consider the possibility of a faulty drain pump.
If it has a mechanical issue, you might see cracks and other visible signs of damage to the pump, which indicate a need for replacement. However, this won’t always be the case, especially when you have an electrical failure.
In such instances, the best way to determine if the pump is defective is through a continuity test. A damaged pump will show no continuity and must be replaced in order for the washer to operate properly again.

What you’ll need:
- Flathead screwdriver
- Pliers
- Towels
- 5/16” nut driver
- Multimeter
- New drain pump assembly
Solution: First, isolate the pump and test it for continuity to confirm that it requires replacement.
- Step 1: Unplug the washer and turn off the power at the circuit breaker.
- Step 2: Turn off the water supply. Then, disconnect the drain and inlet hoses from the washer.
- Step 3: Move the washer away from the wall and tilt it forward to access the drain pump at the bottom of the unit.
- Step 4: Carefully remove the insulation underneath the washer and set it aside.
- Step 5: Lay a towel or a rag in case of accidental spills.
- Step 6: Locate the drain pump assembly. Check the user manual for reference, if needed.
- Step 7: Unplug the wires connected to the drain pump. Use a flathead screwdriver if the wires are hard to pull out.
- Step 8: Use the pliers to loosen the clamps securing the hoses.
- Step 9: Disconnect the hoses from the pump.
- Step 10: Use the 5/16” nut driver to remove the screws mounting the pump to the washer.
- Step 11: Isolate the pump from the washer.
- Step 12: Try spinning the impeller on the pump. If it rotates all the way without any resistance, your pump is most likely defective.
- Step 13: Get a multimeter and set it to 2 kilo ohms.
- Step 14: Touch both of the prongs on the multimeter to the electrical terminal on the drain pump assembly.
A functional pump will have a reading of 160 to 260 ohms with about 5% leeway. The lowest possible reading should be 152 ohms and anything less than that should indicate a defective pump.
Unfortunately, you can’t repair a faulty pump, but you can replace it. To replace a drain pump on a top-load Maytag washer, follow these steps:
- Step 1: Unplug the washer and turn off the power at the circuit breaker.
- Step 2: Turn off the water supply. Then, disconnect the drain and inlet hoses from the washer.
- Step 3: Move the washer away from the wall and tilt it forward to access the drain pump at the bottom of the unit.
- Step 4: Carefully remove the insulation underneath the washer and set it aside.
- Step 5: Lay a towel or a rag in case of accidental spills.
- Step 6: Locate the drain pump assembly. Check the user manual for reference, if needed.
- Step 7: Unplug the wires connected to the drain pump. Use a flathead screwdriver if the wires are hard to pull out.
- Step 8: Use the pliers to loosen the clamps securing the hoses.
- Step 9: Disconnect the hoses from the pump.
- Step 10: Use the 5/16” nut driver to remove the screws mounting the pump to the washer.
- Step 11: Disconnect the faulty drain pump from the washer.
- Step 12: Get your replacement and attach it to the hoses.
- Step 13: Use the 5/16” nut driver to reinstall the screws and secure the pump to the washer.
- Step 14: Use pliers to tighten the clamps on the hoses to secure the connections.
- Step 15: Plug in the wires to the terminals on the pump.
- Step 16: Reinstall the insulation.
- Step 17: Keep your washer upright. Then, reconnect the drain and inlet hoses to the unit.
- Step 18: Turn on the water supply and reconnect the washer to power.
- Step 19: Run a test cycle to confirm that the unit can drain properly.
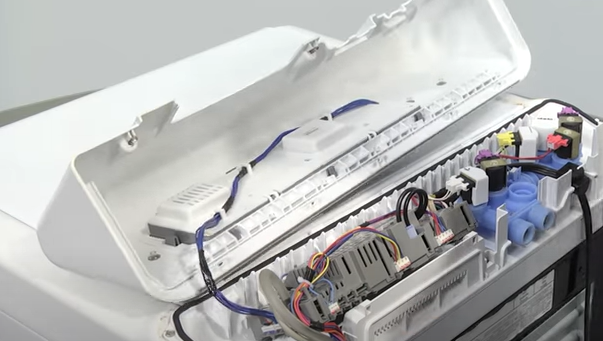
Defective Main Control Board
The main control board is responsible for various functions in your washing machine, including spinning, washing, cleaning, and draining. If this component is malfunctioning, it can cause different symptoms, which makes it hard to diagnose.
You should only consider a defective main control board once you’ve ruled out everything else, including a faulty drain pump.
What you’ll need:
- Flathead screwdriver
- ¼” nut driver
- Pliers
- Multimeter
- New main control board
Solution: Remove the main control board and test it for continuity to confirm that it is defective and requires replacement. Just follow the steps below:
- Step 1: Unplug the washer or turn off the power at the circuit breaker.
- Step 2: Turn off the water supply, then disconnect both inlet hoses.
- Step 3: Move the washer away from the wall and turn it around to access the back panel.
- Step 4: Use a ¼” nut driver to remove the bolts mounting the panel.
- Step 5: Insert the flathead screwdriver under the front control panel housing, then pry it open.
- Step 6: Disconnect the wire harness and set the control panel aside.
- Step 7: Take a photo of the wires connected to the main control board. Use it as a reference for the reassembly process.
- Step 8: Disconnect the switch wire connectors on the control board, including the power wire. Then, use a flathead screwdriver to release the bracket and retainer.
- Step 9: Detach the air pressure tube.
- Step 10: Use a ¼” nut driver to unfasten the screws securing the control board.
- Step 11: Remove the center knob, then lift the control board to isolate it from the washer.
- Step 12: Check the control board for burns and discoloration, which are tell-tale signs of damage.
- Step 13: Get a multimeter and test the pump for continuity. Rotate the dial to the Continuity Test mode.
- Step 14: Place each probe on each side of the fuse on the control board.
If the multimeter beeps, it means that the fuse is good and the control board is functioning well. However, if you hear nothing, the fuse is defective, which means that the control board needs replacement.
To replace the main control board of a top-load Maytag washer, follow these steps:
- Step 1: Unplug the washer or turn off the power at the circuit breaker.
- Step 2: Turn off the water supply, then disconnect both inlet hoses.
- Step 3: Move the washer away from the wall and turn it around to access the back panel.
- Step 4: Use a ¼” nut driver to remove the bolts mounting the panel.
- Step 5: Insert the flathead screwdriver under the front control panel housing, then pry it open.
- Step 6: Disconnect the wire harness and set the control panel aside.
- Step 7: Take a photo of the wires connected to the main control board. Use it as a reference for the reassembly process.
- Step 8: Disconnect the switch wire connectors on the control board, including the power wire. Then, use a flathead screwdriver to release the bracket and retainer.
- Step 9: Detach the air pressure tube.
- Step 10: Use a ¼” nut driver to unfasten the screws securing the control board.
- Step 11: Remove the center knob, then lift the faulty control board to remove it from the panel.
- Step 12: Get your new control board. Before installing it, transfer the wire retaining bracket from the old assembly to the new one.
- Step 13: Align the control board with the slots on the panel.
- Step 14: Reinstall the screws to secure the board. Then, return the center control knob.
- Step 15: Plug in all the wire connectors to the correct terminals on the new control board. Use your photo for reference.
- Step 16: Secure the wires on the bracket and retainer.
- Step 17: Reattach the air pressure tube.
- Step 18: Align the control panel with the rear panel, then push down until it snaps into place.
- Step 19: Reinstall the screws on the rear panel.
- Step 20: Reconnect all the hoses.
- Step 21: Turn on the water supply and restore power to the washer.
- Step 22: Run a test cycle to confirm that the washer drains properly.
Quick Note:
The main control board is quite an expensive component to replace. Thus, you can save hundreds of dollars by replacing the part yourself.
However, if you have a very old washer, you might want to consider buying a new unit instead of replacing the main control board.
Frequently Asked Questions
Maytag recommends the Swash laundry detergent, which is formulated to work in both HE and traditional washing machines. It has an 8x concentrated formula.
To prevent excess foam, which can cause drainage problems, you only need to pour a quarter of the amount of detergent you’d need with a 2x concentrated formula.
Regardless of the brand, washing machines must be cleaned after every 30 washes. That’s once a month for most households.
Maytag recommends using the affresh tablets that are formulated to clean the interior of your washer. It is composed of active ingredients that break down dirt and grime.
Without routine cleaning and maintenance, you’re more likely to experience clogs and malfunctions. It might also cause your washer to smell, which can transfer and soil your clothes.
Yes. The majority of the drainage issues you’ll experience with your washing machine will be minor and easy to troubleshoot.
Most of the time, you can repair drain issues, as well as other common problems, with routine cleaning. Then, you can prevent them from recurring with proper care and maintenance.
You can opt to call a professional to troubleshoot a Maytag washer when the problem has to do with your household’s electrical and/or plumbing system. Do not attempt to perform such fixes as your inexperience may cause injury or death.